Showing posts with label Christmas. Show all posts

Saturday, November 22, 2014

Looking through a Christmas Window

It’s beginning to look a lot like Christmas!  *singing*  At least it does in every store in town!  Many of us like to get our Christmas cards done early so we here on the blog are giving you ideas on what you can make using paper from Paper Temptress's  Christmas Paper Pack.

????????

I used Red Ruche from the Christmas Paper Pack  for the outside of the house and  I made the window out of the Autumn Hay.  The greenery is the gorgeous Emerald Metallic cardstock.

????????

As you open the card you will see that the window was cut open so that you can see the main image on the inside of the card.

????????

Here’s the image on the inside of the card.  I sponged some yellow around the image to make it more warm and welcoming.

????????

Thank you for stopping by!  I will be taking some time off from the blog for the month of December while my husband has surgery but I'll be back after the first of the year!  I hope you all have a wonderful holiday season!

Saturday, November 8, 2014

Blast from the Past - Snowflakes Tutorial

Since I'm living in a construction zone right now due to an unfortunate plumbing issue which led to the dishwasher flooding our kitchen and hallway, getting underneath our wood laminate flooring and into our walls... I decided it would be a good idea to post a Blast from the Past post using one of my favorite cards from last year.  What's great is that the Paper Temptress's Christmas paper package is on sale again right now!!!  I love this paper so much that I've ordered more of it throughout the year.  It's gorgeous!  Now onto the post:

I have a special treat for you today!  This is one of the cards I made using the Paper Temptress's Christmas paper package which is on SALE!!  You can really get a lot of cards out of the package!   I tried a new technique for this card which is called Die Cut Inlay.  The paper I used are: Black Onyz Mica/MetallicRusso Incandescent and Candido Incandescent for the snowflakes.

 ???????????????????

 I found a video by Jennifer McGuire here: Die Inlay It's a fun technique and I think I did pretty well considering this was my first try at it.  I had to work with a LOT of small pieces because I chose snowflakes... which have a lot of small pieces.  hehe!

First, you need to choose your background paper and the inlay paper.  You need to decide where you want the inlay pieces (snowflakes) to be on the background paper.   I placed the snowflake dies on top of the black Onyz background, taped them into place and ran it through my die cutting machine. (pictured below - you can see the black snowflakes top left of the image and the black background cut out just below.)  You then need to cut the same pieces (in my case - the snowflakes) out of the contrasting (inlay) paper also shown below:

 ????????

Be sure to save all the little pieces - you'll need them!  Next you will adhere your background paper to the card and then start filling in the white spaces.  It's just like a puzzle.  You need to be sure to fit the snowflakes and the tiny pieces in where they fit.  You'll need to dot liquid glue to the backs of the pieces.  My favorite glue is Aleene's Quick Dry Tacky Glue found in most craft stores.  The smaller bottle has a fine tip so you can easily manage how much glue comes out.  Try not to get glue on the background paper or on the top of the snowflakes.  I use tweezers to pick up the pieces and place them onto the card.

????????

You can see that parts of a couple of snowflakes hang over the edge.  Carefully cut off the excess for a professional look.  You can see in the photo below how the card is one layer.  I added 1/2 pearls to the snowflakes to give them an elegant look.

????????

I added a sentiment for the finishing touch.  I just LOVE how the Black Onyz shines in the light.

????????

Thank you for stopping by!  This was a fun card to make even if it was kind of time-consuming.  But once I started putting the "puzzle" together, it was fun and went quickly!  If you try this technique of Die Cut Inlay, please let me know!  I'd love to see it!  

The Good Stuff:
Snowflake dies: Lifestyle Crafts - Snowflakes / Spellbinders - Create A Flake One / Sentiment stamp - Stampin Up - Angelic Joy (no longer available) / Spellbinders dies: Fancy Framed Tags Two & Labels Twenty

Saturday, December 21, 2013

Oh Come Let Us Adore Him

Are you ready for Christmas?? If you are then hooray for you!  Me... not so much!  haha  But I'm working on it!
My card today is a simple yet elegant Christmas card.  The background is the gorgeous Black Onyz .  The stamp "Come to Bethlehem" by Stampin' Up was embossed with silver embossing powder.  The sentiment was stamped onto Autumn Hay glimmer paper and then a red silky ribbon was added.  Easy Peasy and fast! 
????????
Thank you for stopping by!  And as always, I appreciate each and every visit and comment!

Saturday, December 7, 2013

Saying Merry Christmas with Poinsettias

I love to say "Merry Christmas!" with these handmade poinsettias!  I LOVE this gorgeous paper from the Paper Temptress!   All the paper I used came from the Christmas Paper package.
?????????????????????????????
Paper:
Poinsettias and "Merry" - Jupiter Red Mica/Metallic
"Christmas" and card background - Candido Incandescent
Embossed background - Emerald Mica
Dies and embossing folder:
Spellbinders - Layered Poinsettia
"Merry" - Taylored Expressions - very merry (with companion die)
"Christmas" - QuicKutz Holiday Phrases
Embossing folder - Cuttlebug - Holly
Thank you for stopping by today!  There's still time to order your paper from the Paper Temptress to make your Christmas cards!  I just ordered mine and it was shipped right away.  Happy Holidays!

Friday, November 22, 2013

Snowflake at Night & A Tutorial

I have a special treat for you today!  This is one of the cards I made using the Paper Temptress's Christmas paper package which is on SALE!! You can really get a lot of cards out of the package and I LOVE the gorgeous papers that come in it.!   I tried a new technique for this card which is called Die Cut Inlay.  The paper I used are: Black Onyz Mica/MetallicRusso Incandescent and Candido Incandescent for the snowflakes.
 ???????????????????
 I found a video by Jennifer McGuire here: Die Inlay It's a fun technique and I think I did pretty well considering this was my first try at it.  I had to work with a LOT of small pieces because I chose snowflakes... which have a lot of small pieces.  hehe!
First, you need to choose your background paper and the inlay paper.  You need to decide where you want the inlay pieces (snowflakes) to be on the background paper.   I placed the snowflake dies on top of the black Onyz background, taped them into place and ran it through my die cutting machine. (pictured below - you can see the black snowflakes top left of the image and the black background cut out just below.)  You then need to cut the same pieces (in my case - the snowflakes) out of the contrasting (inlay) paper also shown below:
 ????????
Be sure to save all the little pieces - you'll need them!  Next you will adhere your background paper to the card and then start filling in the white spaces.  It's just like a puzzle.  You need to be sure to fit the snowflakes and the tiny pieces in where they fit.  You'll need to dot liquid glue to the backs of the pieces.  My favorite glue is Aleene's Quick Dry Tacky Glue found in most craft stores.  The smaller bottle has a fine tip so you can easily manage how much glue comes out.  Try not to get glue on the background paper or on the top of the snowflakes.  I use tweezers to pick up the pieces and place them onto the card.
????????
You can see that parts of a couple of snowflakes hang over the edge.  Carefully cut off the excess for a professional look.  You can see in the photo below how the card is one layer.  I added 1/2 pearls to the snowflakes to give them an elegant look.
????????
I added a sentiment for the finishing touch.  I just LOVE how the Black Onyz shines in the light.
????????
Thank you for stopping by!  This was a fun card to make even if it was a little more time-consuming than most cards.  Once I started putting the "puzzle" together, it was fun and went quickly!  If you try this technique of Die Cut Inlay, please let me know!  I'd love to see it!  Please leave a message for me below! 
The good stuff:
Snowflake dies: Lifestyle Crafts - Snowflakes; Spellbinders - Create A Flake One 
Sentiment: stamp - Stampin Up - Angelic Joy.  (Unfortunately this stamp has been discontinued and is no longer available) 
Spellbinders dies: Fancy Framed Tags Two & Labels Twenty
Thank you for stopping by!  I hope you enjoyed the tutorial and don't forget to let me know if you make a project using the Die Cut Inlay technique!  

Tuesday, November 19, 2013

Christmas Cards Galore! And a SALE!!!

I haven't been posting very often because I've been creating Christmas cards like mad!  Below is an idea of what I've been doing.  All of these card fronts are made using paper from the Paper Temptress.  I only used 1/2 of the Christmas paper package!  These papers are luscious and so fun to work with.  And you're in luck!  This paper package is ON SALE right now!!!  So hop on over to the store by clicking here.


Stay tuned because I plan to highlight these cards one at a time and will include a few tutorials.

Thank you for stopping by and don't forget to leave a comment!  Comments make my day! 

Saturday, November 9, 2013

Through a Christmas Window

It's beginning to look a lot like Christmas!  *singing*  At least it does in my craft room!  I have been busy making Christmas cards from the wonderfully beautiful paper from the Paper Temptress!   All of the paper I used is from the Christmas Paper Pack.

????????

I used Red Ruche for the outside of the house.  I made the card out of the white paper found in the Christmas Paper Pack.    I made the window out of the Autumn Hay.  The greenery is the gorgeous Emerald Metallic cardstock.

????????

As you open the card you will see that the window was cut open so that you can see the main image on the inside of the card.  The image is from Stampin' Up called Welcome Christmas.  Unfortunately this set has been discontinued but you can still purchase the digital version here:  Welcome Christmas Stamp Brush Set - Digital Download .  The die I used is Taylored Expressions Picture Window.  

????????

Here's the image on the inside of the card.  I sponged some yellow around the image to make it more warm and welcoming.

????????

Thank you for stopping by!  I'll be back another time with more Christmas cards I made using 1/2 of paper from the Christmas Paper Pack.  I've made 8 cards and am still working on more so stay tuned!  
Have a great weekend and don't forget to leave a comment!  We all love comments!

Thursday, December 20, 2012

Little Christmas Elf

Christmas is almost here!  I don't know about you but I could use at least another week to prepare!  This week we are having another review.  You can choose between sketches # 48 - #52.  You can see the different sketches on the MTME Blog HERE.  I used sketch #51. 

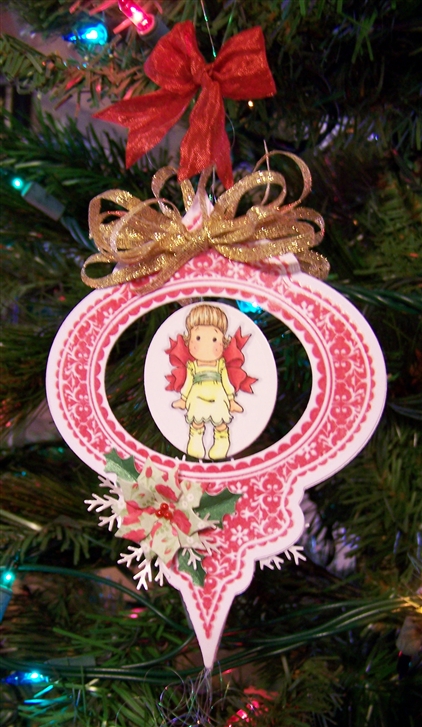
I made another Christmas card since next week is Christmas.  I used this cute little elf from the set Holly Jolly.  I cut her out and put her on an ornament I made using Spellbinders 2012 Heirloom Ornaments.  I colored her with copics and used Liquid Applique on her collar and the pom-pom on her hat.  


I cut out a poinsettia using Spellbinders Layered Poinsettia and added some yellow pearls to the center.  The paper I used is from Candy Clause.  


I hope you are getting ready for Christmas or any other holiday that you celebrate.  Please stop by the MTME Blog and see what the other designers have in store for you.  

Thank you for coming by today.  I appreciate each and every visit and comment.  

Thursday, December 6, 2012

Christmas Ornament Card

It's the Most Wonderful Time of the Year!!!  Oh yeah, Christmas shopping, baking, decorating, going to parties and of course performances.  My youngest son is performing in Sweeny Todd, one of my nieces is in a dance company and will be performing several times and another niece is in band.  To top it all off, we tore up the 40-year old carpet in living room, old tile in hallway and 40 year old vinyl in the kitchen and re-did all those floors.  We still don'g have it all put back together again.  What fun!  

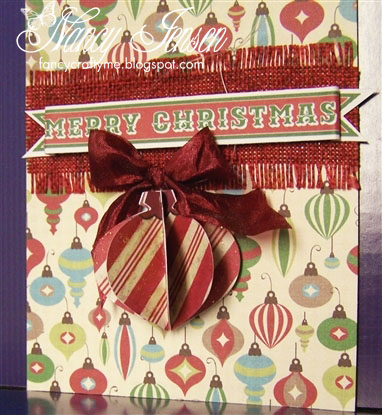
This week we are to choose a sketch from the weeks of 41 - 47.  I chose to use #46.  The circle on the sketch made me think of a Christmas ornament so I made one!


I printed the red stripped digi paper from Candy Claus and punched out 6 ornaments with my Stampin' Up ornament punch.  I then scored each ornament in half, lined up the back halves and glued them together.   I added some diamond Stickles over the top of each side and smoothed it out with a brush.  I couldn't get a good picture of the glitter but it's there.  I poked a hole in the top, threaded fishing wire the hole and through the back of the bow.  I tied the bow onto the top of the ornament and then tied a knot at the top of the fishing line forming a loop to hang onto the tree.


The card base paper is also from Candy Claus.  I used the banner "Merry Christmas" from our new release, Christmas Swag.  I temporarily put some pop-up dots behind the ornament so it will stay on the card.  The ornament will easily come off the card and can be hung onto a tree. 


I hope you enjoyed my card today.  Please stop on by the MTME Pretty Patterns blog and see the rest of the great samples our team has made for you today.

As always, I appreciate each visit and comment you leave for me.  Hope you enjoy the holidays!


Monday, December 19, 2011

Wrapped Up Tilda Holiday Challenge

I made this cute ornament for the Wrapped Up Tilda Holiday Challenge.  The contest is now closed and I barely made it in time.  Silly me, I've been down with a major fibromyalgia flare so I haven't been doing much of anything, really, so it was a miracle that I was able to finish this project on time!


I bought both the Wrapped Tilda and Unwrapped Tilda at the Magnolia-licious store where Diana has these two stamps sold together for one low price of &8.99.  


The ornament was stamped with Waltzingmouse Stamp set Vintage Ornmanet.  Here's a close-up for this Tilda.


I used Sulkey thread and adhered it in between two circles to make a suspension ornament.  The inner circle can turn on it's own.  (sorry that the picture is so blurry)


This is the other side of the ornament.  


Blow is a close-up of the Tilda image.

I used Spellbinders layered poinsettia dies for the poinsettias on each side of the ornament and a Martha Stewart punch for the white leaves.

Thanks for stopping by!  I appreciate each visit and comment!

Other Challenges:
Waltzingmouse Makes - Christmas tag

Friday, December 16, 2011

Season's Greetings!

Today I'm sharing a set of Christmas cards that was so fast and easy to make!  I made these for my monthly card making group which is a Stampin' Up! club.


I used Stampin' Up's embossing folder Northern Flurry for the front of the card.  I don't usually make one layer cards so I was a little leery to try this but I think it worked out well - and it was so fast!  


For the sentiment I used "Season's Greetings" from Festive Frames - from Gina K Designs store.


I added a bow and red "bling" and there you have it!  A quick, easy Christmas card!  

Challenges:  
Joan's Garden - make a quick Christmas card
Creative Inspirations - all-white card
Cupcake Inspirations - image - I used the colors red, white and gold found in the image and snow to reflect the snowman.
Simply Create Too - embossing
Paper Players: color challenge - cherry cobler, gold and very vanilla

Thank you for stopping by.  Each visit and comment are greatly appreciated.

Sunday, October 5, 2008

Another Christmas Card

I used one of the other Christmas trees that I had stamped and embossed to make a quick card for another Kitchen Sink Stamps challenge.

I made this one for Maria's challenge. She asked us to use something that we had perhaps had put away and had never used (or had rarely used). I purchased the iridescent poweder from SU at least two years ago and never used it! So my card qualifies for this challenge since I used the iridescent powder for the first time! :D I liked this challenge since it got me to use something that I was a little nervous to use. It did get kinda messy - just don't tell my hubby. He HATES gitter. LOL!

Here's my card:


Gosh, it's hard to find an angle so you can see the embossed part shine! It really does shine in person when you move it around in the light.


See? It really is a different card. :) I think I like them both. Do you have a preference?


Thanks for stopping by!

A Christmas Card!

I can't believe it's already time to be thinking about making Christmas cards! Yesterday was "World Card Making Day". I didn't get a chance to actually make a card until late at night... but I decided to make one for a challenge. Why not? They are fun! The Kitchen Sink is having a lot of challenges and prizes. I'm doing Tracy's challenge: to make a Christmas card.

So here's my card:
The paper is from Creative Memories new Jewel Christmas Kit. (I had a green backdrop to make the card stand out and also to coordinate with the card.) The stamps I used are Stampin' Up's new Snow Swirled set.


I'm lovin the bling! I used Jessica's GeMagic (knock-off of the Beadazler) to put on the little gems on the card. I used my new SU punch and a stamp from SU's "Cute & Curly" set for the little tag. I had some soft, shiny ribbon which I think really made it look nice.


I used white pigment ink and SU's and Iridescent embossing powder. Boy is that stuff messy! I even wiped everything down with an embossing buddy but that stuff still stuck to everything! At least I sparkle now, right? LOL

I wanted to show you an ooops! I had the heating tool on one area too long and it turned kind of yellow. I ended up using the green paper on my card underneath the red. I stamped and embossed four pieces of paper just in case I made a mistake (which I did) or so I could make more cards with them. So just be careful not to keep your heating tool on one spot too long. I'm sure all of your pro stampers out there are giggling at my mistake because you already knew that - but that's OK, I gotta start somewhere.


Here's a picture that shows how the iridescent powder really sparkles in the light.


If you have any advice as to how to keep the Iridescent powder from getting all over my house, please let me know! Or if you have any other advice for a beginning stamper, I'm always looking for ways to improve.

Thanks for stopping by! I hope you enjoyed your visit!