Showing posts with label Gina K Designs. Show all posts

Friday, December 16, 2011

Season's Greetings!

Today I'm sharing a set of Christmas cards that was so fast and easy to make!  I made these for my monthly card making group which is a Stampin' Up! club.


I used Stampin' Up's embossing folder Northern Flurry for the front of the card.  I don't usually make one layer cards so I was a little leery to try this but I think it worked out well - and it was so fast!  


For the sentiment I used "Season's Greetings" from Festive Frames - from Gina K Designs store.


I added a bow and red "bling" and there you have it!  A quick, easy Christmas card!  

Challenges:  
Joan's Garden - make a quick Christmas card
Creative Inspirations - all-white card
Cupcake Inspirations - image - I used the colors red, white and gold found in the image and snow to reflect the snowman.
Simply Create Too - embossing
Paper Players: color challenge - cherry cobler, gold and very vanilla

Thank you for stopping by.  Each visit and comment are greatly appreciated.

Friday, September 30, 2011

Happy World Card Making Day


Today is World Card Making Day!  I am so excited to share a Christmas Card with you today as we go through Operation Write Home's  blog hop.  If you haven't heard of Operation Write Home it's an amazing program where card makers can send hand-made cards to soldiers who then use them to write home.  The soldiers received hand-made cards for all occasions to use to send special messages to their loved ones who are left at home while the soldiers are deployed.  What a wonderful program indeed!

For today's Christmas card I had a lot of fun using my Big Shot and my Cricut!  I also used one of my favorite stamps sets by Gina K Designs, Heirloom Ornament Stamp set.  


I stamped the image with Purely Pomegranate (Stampin' Up) ink and then embossed it with clear embossing powder.  You can probably see the embossing a little better below.


It is a delicate card with all the swirls but I like it.  The card base is cut out using Spellbinders Parisian Motifs.  The white shiny snowflake is cut out using a Cricut cartridge called Winter Lace.


I added a little bling and a bow and it was done!  This cute card is small enough that it could hang on a Christmas tree.  I just might have to make one for each of my siblings this year!  (but shhhh, it's a surprise!  lol)


Thank you for stopping by!  I appreciate every visit and comment.  Have fun visiting the rest of the participants in the hop!

And don't forget to visit the link below to see MANY other crafters who are participating in World Card Making Day!

Preview

Tuesday, February 1, 2011

Yellow Rose Sympathy Card

*Update* - I've added all the details about this card which was SO FUN to make!

Here's my card for Joan's challenge:

I made this Sympathy card for a dear friend of mine who's husband passed away recently after a long difficult battle with cancer.  My friend, Kathy, also has a son with CHD (congenital heart defects).  That's how I met her online over 10 years ago.  


Here is what you need to do for Joan's Gardens Weekly Challenge #4....
1.  Use Yellow and Green for your colors
2.  a piece of trim
3.  a frame to call attention to your focal point
4.  embossing

You will have until next Thursday (February 3) morning 6:00 AM EST to link your card/project. A winner for the prize will be chosen from a Random drawing and will be announced Friday morning (February 4). You can enter more than once.

You can see that I not only framed the yellow rose but I cut the opening all the way through the card so the rose could be seen.  It's really hard to see in the photos but the butterflies were cut out of glitter paper.  It gives a touch of shine in real life.


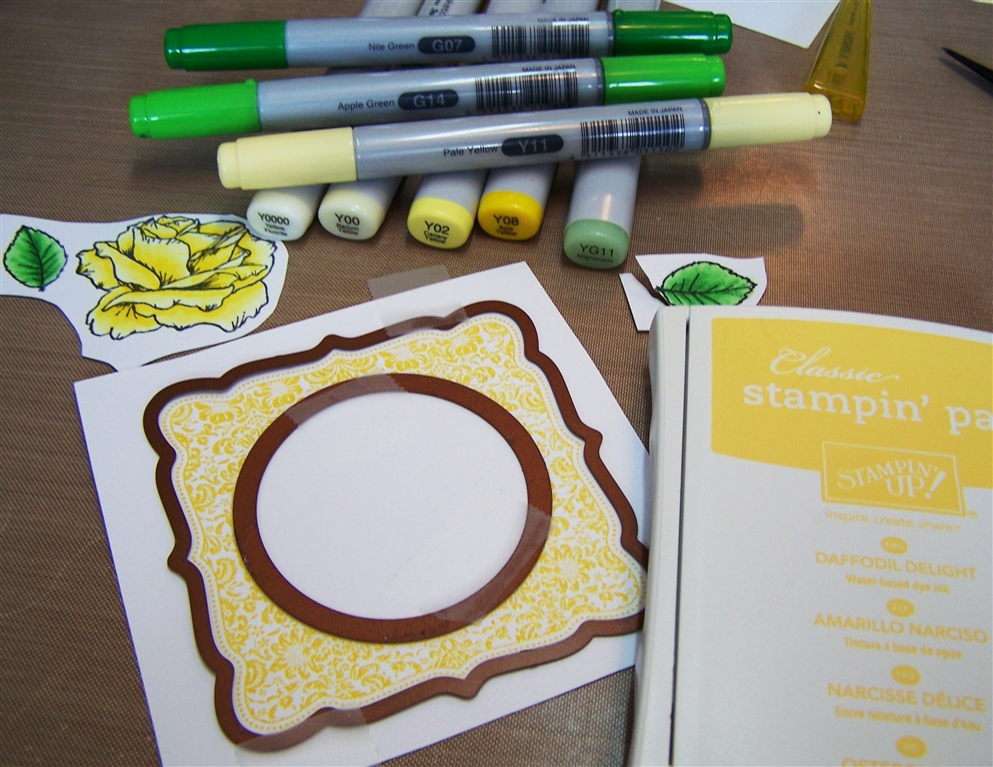
I used copics to color the rose and leaves and I embossed the frame so it's kind of shiny.  Below is a picture of the copics I used and the stamp pad color for the frame.  The Spellbinders nesties are also in the photo so you can see how I cut/embossed them in my Big Shot.  I used Scotch removable tape to keep the nesties in place.  I am careful not to put the tape on the stamped area because even though the tape removes easily without tearing the paper, it can leave the paper a little sticky.


I love the sentiment.  I'm so very grateful for all the support I have from family and friends since my daughter passed away 4 months ago.  I hope my friend feels that love and support from me and hopefully many others as well.


Here's a view of all the lovely dimensions on this card.  The white trim did not have the little white pearls on it but I thought it added just the right touch.


Here's a photo where you can see the embossing on the card a little better.  The hardest thing about this challenge is that I kept wanting to add pink to it!  haha!  I'm a pink flower type person but I think this turned out ok.


Thank you so much for your visit and of course EVERYONE loves comments!

What's in it:
Stamps: All from Gina K DesignsBotanicals, Friends, Year of Flowers, Lovely Labels 2
Paper: Prima's Annalee, Neenah Solar White, Coordination's Glitz and Glam green glitter paper.
Ink: Momento Tuxedo black, Stampin Up Daffodil Delight, copics
Ribbon:  Stampin Up So Saffron Polytwill
Embellishments: white floral trim - from my stash (I don't remember where I bought it), Kaiser pearls
Tools: Spellbinders circle nestabilities and labels fifteen, Big Shot, Martha Stewart butterfly punches 

 This card qualifies for the following challenges:  
           Joan's challenge


Thursday, December 16, 2010

Santa Tilda on Winter Mitten

I had so much fun making this card. 


It qualifies for several challenges.  First, I got the sketch from Stamp TV Sketch Spotlight Challenge- STVSKSP5,  There She Goes Challenge which is to use your stash: (I used some polar white flower soft that I bought a YEAR ago and haven't used since.), and Just Magnolia which is to make a Christmas card. 

Here's a different angle so you can see the dimensions and the fun flower soft on her hat.


I colored Tilda with copics and then added the fluff to her hat by adding the polar white flower soft.  The mitten is from Gina K Designs and was stamped in melon mambo and bermuda bay.  The tag was made with Stampin' Up stamps and tiny tag punch and the snowflake was made with both Sizzix die cut and Martha Stewart punch with a little light pink gem in the center.  The circles were cut with Spellbinders.  

Thank you for stopping by!

Monday, July 26, 2010

What's Cooking?

Here is a card that I made for 2 challenges. Unfortunately though I didn't get it finished in time for one of the challenges which was to do a kitchen theme. The second challenge I made this card for was StampTV's Tuesday Sketch Challenge.
(as always, click on any image to enlarge)


Here's my take on it:


I LOVE this fun paper by Cosmo Cricket called Garden Variety. The lady is colored with copics and is from Sew Pretty by Asela Hopkins. I paper pieced the apron from one of the Garden Variety papers too. They are so fun! The flower was cut out of felt with Papertry Ink's Beautiful Blooms II dies.

On the inside of the card I used Papertry Ink's Background basics: tin types and Fillable Frames #5 for the frame. The sentiment and hot pot holders are from the Sew Pretty stamp set.

I've been trying to figure out how best to take photos of my cards. I am usually crafting late at night since my daughter (who is chronically ill) keeps me pretty busy the rest of the day. Below is a photo of a shelving unit that my husband made for me which is above my desk. I have a small (cheap) light that I shine over the card. As you can see, the light it shines is quite yellow. I always have all the lights on in the room when I take a photo to get as much light as I can. When possible, I try to take the photo during the day and then I also open the blinds to let in all the natural light. I usually take several pictures and upload them to my Creative Memories: Memory Manager where I can edit the photo by cropping, adjusting lighting and colors and even changing the size and other fun stuff. I bought it when I was a CM consultant and I really like it. If you have any other ideas on how to take good photos of the cards, I'm open to your suggestions! I'd also like to see how YOU take photos of your cards!


Thank you so much for visiting my blog. I hope you have a great day!

Monday, June 22, 2009

A Year Of Flowers Blog Hop!

I made this card for Melanie's A Year of Flowers Blog Hop! I used two sets that Melanie designed. First I used the rose, leaves and lady bugs from "A Year of Flowers". I stamped them onto watercolor paper and used "Peerless Water Colors" to add the color. It was so much fun using these watercolors. The sentiment is from Melanie's set "The Best Things in Life". Both these sets are MUST-HAVES in my opinion!


Here's a different view showing the dimensions.


The card partially open.


Inside of the card with room for writing.


A little dimension on the inside too.
The ladybugs were so much fun to make... but a little difficult to cut out. lol


I hope you enjoyed this card as much as I enjoyed making it.
Here are the deets:

Stamps: "A Year of Flowers", "The Best Things In Life"
Ink: Old Olive, Riding Hood Red, Moment Tuxedo Black
Paper: Basic Grey Sultry, SU: Barely Banana, Certainly Celery, Pretty In Pink, watercolor paper
Accessories: Martha Stewart punch, Quickutz Frame, Basic Grey brads

PS: I gave this card to my MOM for her birthday! It was so hard to give it away but who else deserves such a card except for the woman who gave me life! She also raised me so she REALLY deserves it! hehe!


Friday, March 27, 2009

Watercolor Rose

I made this card for last week's sketch challenge on StampTV and also a challenge on SCS (Splitcoast Stampers) .

I used Melanie's "A Year Of Flowers" and stamped the rose in Ridinghood Red and I stamped the leaves in Garden Green and embossed both in clear embossing powder. (I stamped them all on watercolor paper) I used my waterbrushes and Peerless Water Colors to watercolor the images. The "thank you" sentiment was from Rupa's "So Grateful". I also popped up the rose and all the leaves on pop-up dots to give them fun dimension. The DP is an old DCWV Spring matstack from several years ago. I embossed the bottom of the card with a cuttlebug border and rubbed a reddish-pink "metallic rub-on" onto the raised part.


I have to admit that I'm quite happy with how the water coloring turned out. The peerless watercolors are sheets of paper with the watercolor on them. I took a ninji waterbrush and touched the tip to the color of my choice. I then colored the rose petals adding more water to lighten the color as I needed and even leaving some areas white. Of course I did the leaves the same way. Here's a picture of what it looks like. Very interesting and cool way to watercolor at a very good price! hhhmmm.... I wonder if I should invest some stock in Gina K Designs? ;-)

I also have this lovely card on my wall right where I can enjoy it... that is until I send it off to a very special person who has probably thought I've forgotten to thank her properly. I am usually soooooooo slow at mailing things. My poor brother and his wife are still waiting for their Christmas card w/gift! *sigh* Whatever are we going to do with me???

Friday, March 13, 2009

Silhouette Butterfly


I made this card using Jessica's sketch on StampTV from 3/5. I was also doing a black/white color challenge from Kwernerdesign Blog Color Inspiratioon #45. I stamped the butterfly from Gina K's "Take Flight" set onto black cardstock and embossed it in white. The layers of DP are from Making Memories and other unknown brands (scraps from previous projects. I didn't have a black ribbon (although Robyn tried to give one to me during Gina K's Release Party last night - LOL ) ..... so I took some white ribbon and colored it with my black copic marker. Genius! I have seen other crafters use copics to color buttons and even flowers so I figured it should work on ribbon - and it did! YAY!

The punches I used were EK Success's dotted scallop - my new favorite punch! And on the inside I also used Fiskar's threading water. I also used SU's ticket punch in the corners and Kasier pearls. *deep breath* Did I remember everything? LOL

Hope you enjoy it!

Here is a side view.


This is the inside of the card

I've really been having fun in my craft room... can you tell?
Thanks for stopping by!