Showing posts with label DT submission. Show all posts

Wednesday, November 11, 2015

Paper Temptress starts new Facebook challenge!

Boy do I have a surprise for you!  PaperTemptress.com has set up a Facebook challenge page with a lot of great prizes offered each month!  November's challenge is:  
~Holiday design …no red or green!~

Here is the DT card I made for a new challenge which started today! 


November's prizes….Paper Temptress: $20.00 gift certificate to one winner. If you use Paper Temptress card stock, and you are the winner you will receive an extra $10.00 gift certificate. You must list the card stock used. Cryogen White is excluded.


The Stamping Boutique/Glitterbabe's: The winner will receive 2 images of their choice. PLEASE NOTE: if the winner used a STAMPING BOUTIQUE or GLITTERBABE image they will receive 1 extra image of their choice making a total of 3 images.
Oozak - $10.00 gift certificate to one winner
Deadline - Dec 7, 2015 @ 9:00PM EST
Rules are listed on PaperTemptress's Challenge Facebook Page
GOOD LUCK! The link is below:


Card details:
I used Stamping Boutique/Glitterbabe's image On the Mantel.  I colored it with copics on X-press It cardstock.  The decorative circle frame is made out of Amethyst cardstock and I put a piece of Hambly Overlays #3 behind it.  The words "Merry Christmas" were cut from Razzleberry cardstock.  I added a little bling to make it sparkle.  Oooohhhh, shiny!  

Thank you for stopping by and I hope you will join us in this fun challenge! 

Thursday, July 7, 2011

A Mother's Day Card

I haven't had a chance to post some cards that I recently made... in fact, I haven't even had time to put the finishing touches on my mom's Mother's Day card so that one will have to wait - but I was able to give my mother-in-law her card so that's the one I want to share with you today.

There is a design team call over at "Our Creative Corner" - the theme is "show us your style".  Well, I have so many different styles that I wasn't sure what to submit but I think that this card shows several styles.  I love shabby chic, elegant, cute, colorful with just a touch of grunge.  Here's my card:


My mother-in-law is quite the seamstress.  She has a huge sewing room with many sewing machines and a lot of sewing supplies.  When I saw this Stampin' Up stamp set, Sew Suite, I just knew I had to have it so I could use it to make cards for her.  My mom and I both sew too so it's a set I'm sure to use quite a bit.

Below is a close-up of the sentiment.  I cut the flower out with larger flower from MFT's die-namic's mini rolled roses.  I used Spellbinder's labels twenty to cut out the sentiment and Spellbinder's label fourteen to cut out the decorative paper behind it.


At first I wasn't sure where I was going to place everything so I stamped the pin cushion and colored it with copics then set it aside.  After I decided that I wanted it on the sentiment I adhered it to the already cut out and sponged sentiment and then used Buttercup Liquid Pearls for the heads of the pins.


I used real buttons on this project and tied them with cotton string.  I really enjoy adding embellishments to my projects.  I made my own card with the sewing manikin stamp and hand-drew the dashes and dots.  I used to do that type of thing all the time in my decorative painting projects.  


I used some hand-dyed seam binding for the bow to add a little shabbiness and also used some distressed inks around the edges of each of the stamped items.  Here is an angle of the card to show the lovely dimensions.


I used the doily stamp from Nina Bracket's "Nana's needlework".  I stamped it with veramark ink on vellum and embossed it with detail white embossing powder.  I then fussy-cut it out around the outside edge.  I think it adds a touch of elegance.


I stamped the spool onto cardstock, colored it in with copics and then cut it out.  I then took some embroidery floss and wrapped it around to look like thread.


On the inside of the card I stamped the sewing machine and colored it with copics. I added a little shine with a glitter pen.


Thank you for stopping by!  I hope you enjoyed your visit and remember:  everyone loves comments - especially ME!  So please leave me a message - they keep me going!  tee-hee!  

And join me a little later when I post my card for My Time Made Easy's Pretty Pattern Sketch challenge.

Saturday, January 22, 2011

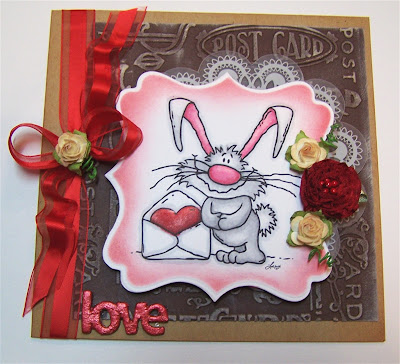
Some Bunny Loves you for the Prairie Fairy

I created this cute card for a chance at being a design team for The Praire Fairy Designs.  They provided the digital image for us to use and we were to make whatever we wanted with it.  I'm afraid I made a mistake and thought it was due by Saturday night and I spent last night (Friday night) watching my son perform with the Thespian Club at his local high school instead of finishing my card.  He played a part in "Drop Dead Juliet" and ended up having to wear a dress and a wig... he also gets stabbed in this play but he kept UN-dying.  It was quite a comedy!  Last night is the only time they will perform this little play here where I can see it... so I HAD to go.  When I came home and started to put the finishing touches on my card I went to the Praire Fairy site and they had closed the submissions.  I was a little down but you know what?  Making the card was so much fun I'm not even going to let it get me down.  I'm going to email them and just let them know that I did make a card.  I don't expect them to set aside their rules just for me (and there's no guarantee that I would win a design team spot anyway)... I just thought they would like to see the card I made with their image.  So without further adieu, here's my card.

This cute little guy is sending his heart in the mail to his bunny love.  I used copics to color him, added a little shimmer to the heart when I painted the "love" with red shimmerz.  I used SU Real Red ink to sponge the edges of the die using the Spellbinders as a mask.  I ran the brown paper through my Big Shot with Tim Holts "Postcard" embossing folder.  I then used vintage cream ink to highlight the embossed area. I used Tea Dye Distress Ink around the card base which is SU's Kraft. 


I tied a bow with some red shiny ribbon that I had in my stash.  Then I added a Maya Road Transparency Doily behind the bunny.  

You can probably see the doily a little better at a different angle in this photo. 

I then added some flowers...


and fancied up the ribbon.. (yes, it is secured that way)

and put it all together and here's what you have:


I'm also submitting this card for two challenges:
Friday Sketchers - sketch
CR84FN color challenge - red, kraft & brown

Thank you for stopping by!  Hope you enjoyed your visit.  I truly appreciate every comment left here.